Page status: readableVersion: 0.92| August 09, 2018
On this Page
How Shakespeare Helps me Teach Digital Publishing
Using public domain texts and other resources
Author: Chris Jennings
Abstract
Masters students in the Oxford International Centre for Publishing (OICP) at Oxford Brookes University get a chance to design and produce a book of one of Shakespeare’s plays and then further develop (to be described in a second article) this as a web site and various eBook formats.
Using Shakespeare’s plays (content in the public domain) helps me, as the tutor for these students, provide all the experience necessary to build wonderful publishable artefacts. They can choose from any of Shakespeare’s plays apart from A Midsummer Night’s Dream; this is the play that I use to demonstrate the various assignments.
Introduction
I have been teaching digital publishing at Oxford Brookes University since 1995, and, un-surprisingly, I have needed to change focus and digital tools many times. From CD-ROM to web, from Macromedia Director to InDesign— you know what I mean. We talked of SGML and Aldus Pagemaker, now we talk of POD (Print On Demand), ePub and XML.
Anyway, we are always re-inventing what we believe the students need to know. My students are studying on an MA Publishing programme and expect to move into the publishing industry.
Content is King (Lear)
We have to work with something. We can’t expect our students to actually create the content (this is not what publishers do). And, in any case, we can’t wait for that to happen; we need something to work with that is available but is also challenging. We need content that can be enhanced with images and even multi-media.
The Play’s the thing 1
The typographic choices when setting a play are really quite interesting, and although there are conventions2 we still have a lot of flexibility. A play includes many different elements which all need to be styled appropriately. Moreover, there is a need to provide a structure to the form that helps the reader work through the flow of the text.
Public Domain
The text for all of Shakespeare’s plays are in the public domain. The texts have been converted to a digital form and can be found in various locations such as the Gutenberg project. Not only is the text available to us, there are many images that we can use to illustrate the plays 3.
The structure of a play
Let’s go through the details of a Shakespeare play and consider the structure.
There will be some prelims such as the title page but thereafter we will need:
Dramatis Personae
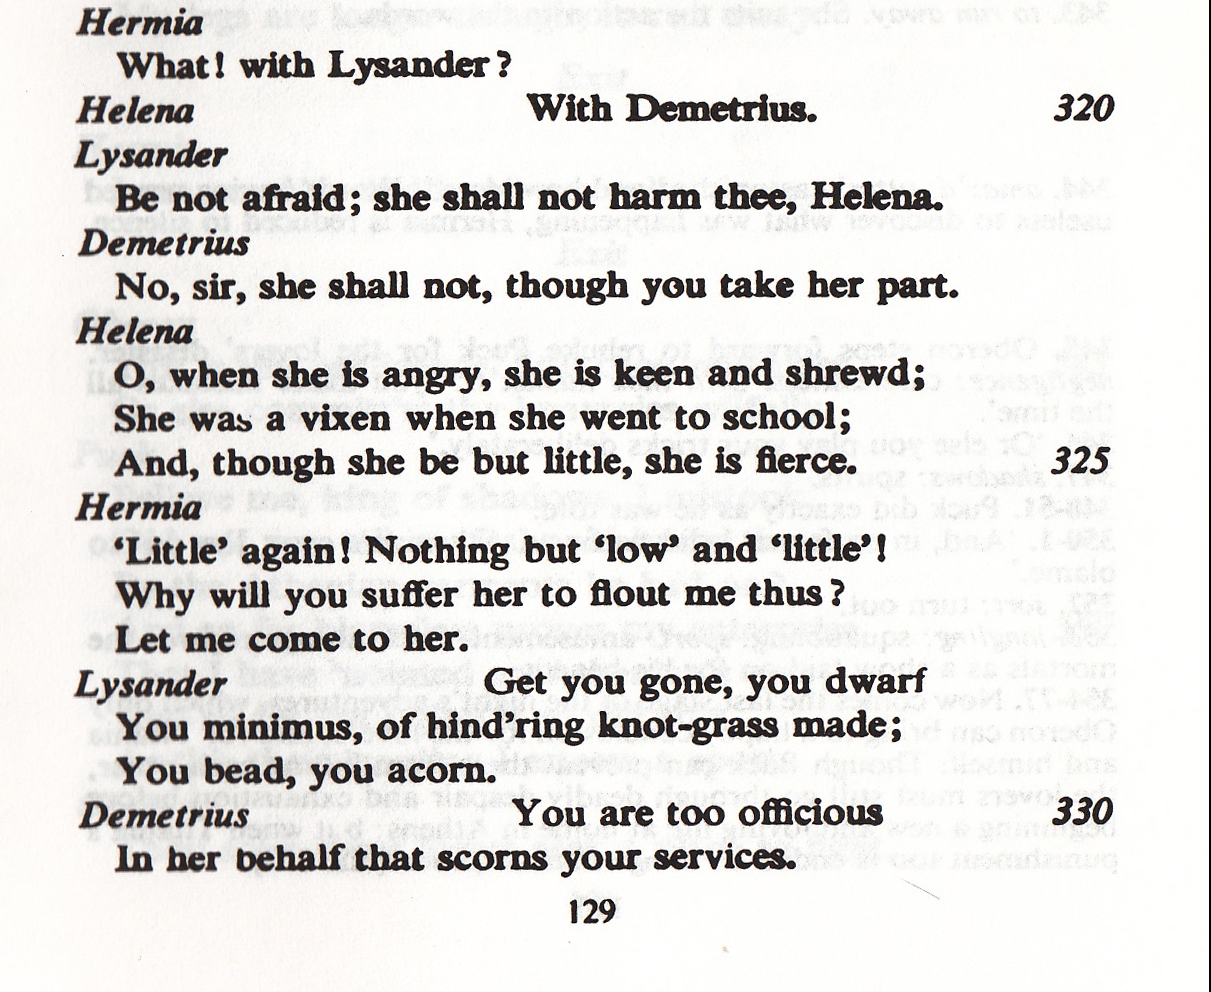
This is where the characters are listed. This is often presented as a list with the character name followed by their role. We are likely to consider the whole line as one entity and then the role inside this. It could be presented as a table. The facsimile (from where the public domain text has come from) may use ditto or long vertical braces where the role is repeated.
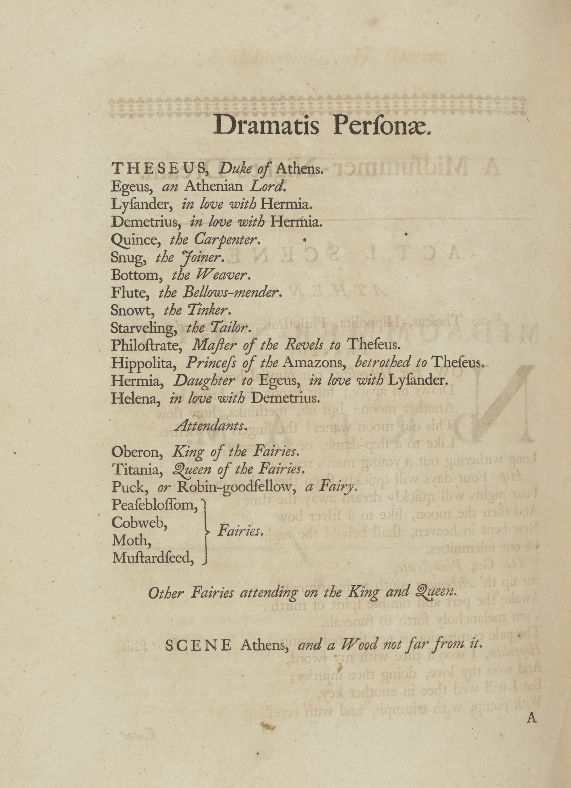
The last line of the Dramatis Personae will announce the general location of the play.
The Play
The structure may be simply several scenes inside an Act. Possibly 5 Acts with 3 or 4 scenes in each. Some plays have a prologue and even an epilogue. In The Taming of the Shrew, the play starts with an Induction.
The Act is the top level in the play structure. The title of this may be simply at the top of the first page or may even have a page (recto in print) dedicate to it. The number could be uppercase roman, Arabic or even a word. So we might depict as:
Act IV, Act 4 or Act Four
The latter being most unusual.
The Scenes, likewise may be as:
Scene III, Scene 3 or Scene Three
The conventions dictate the first of these in each case, but we are looking at the possible options and encourage new choices.
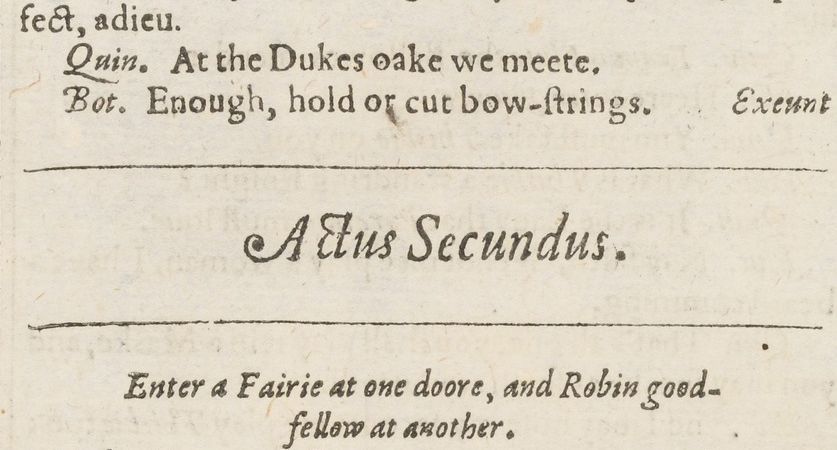
Note that in the First Folio4 no Scenes are constructed and the acts are labelled thus: Actus Secundus
Each scene label is normally followed by a location for that scene.
Location
This is where the scene takes place and is an element in its own line.
Now follows the first stage direction.
To be or not to Be
The character name
The words spoken in the play will be preceded by the name of the character and the method of displaying this is our first structure and presentation conundrum.
To explain the issue we should look at how the character name is presented in print versions of the play, and we might look first at detail from a page from the first folio of Shakespeare’s works. The image below shows the a page of A Midsummer Night’s Dream
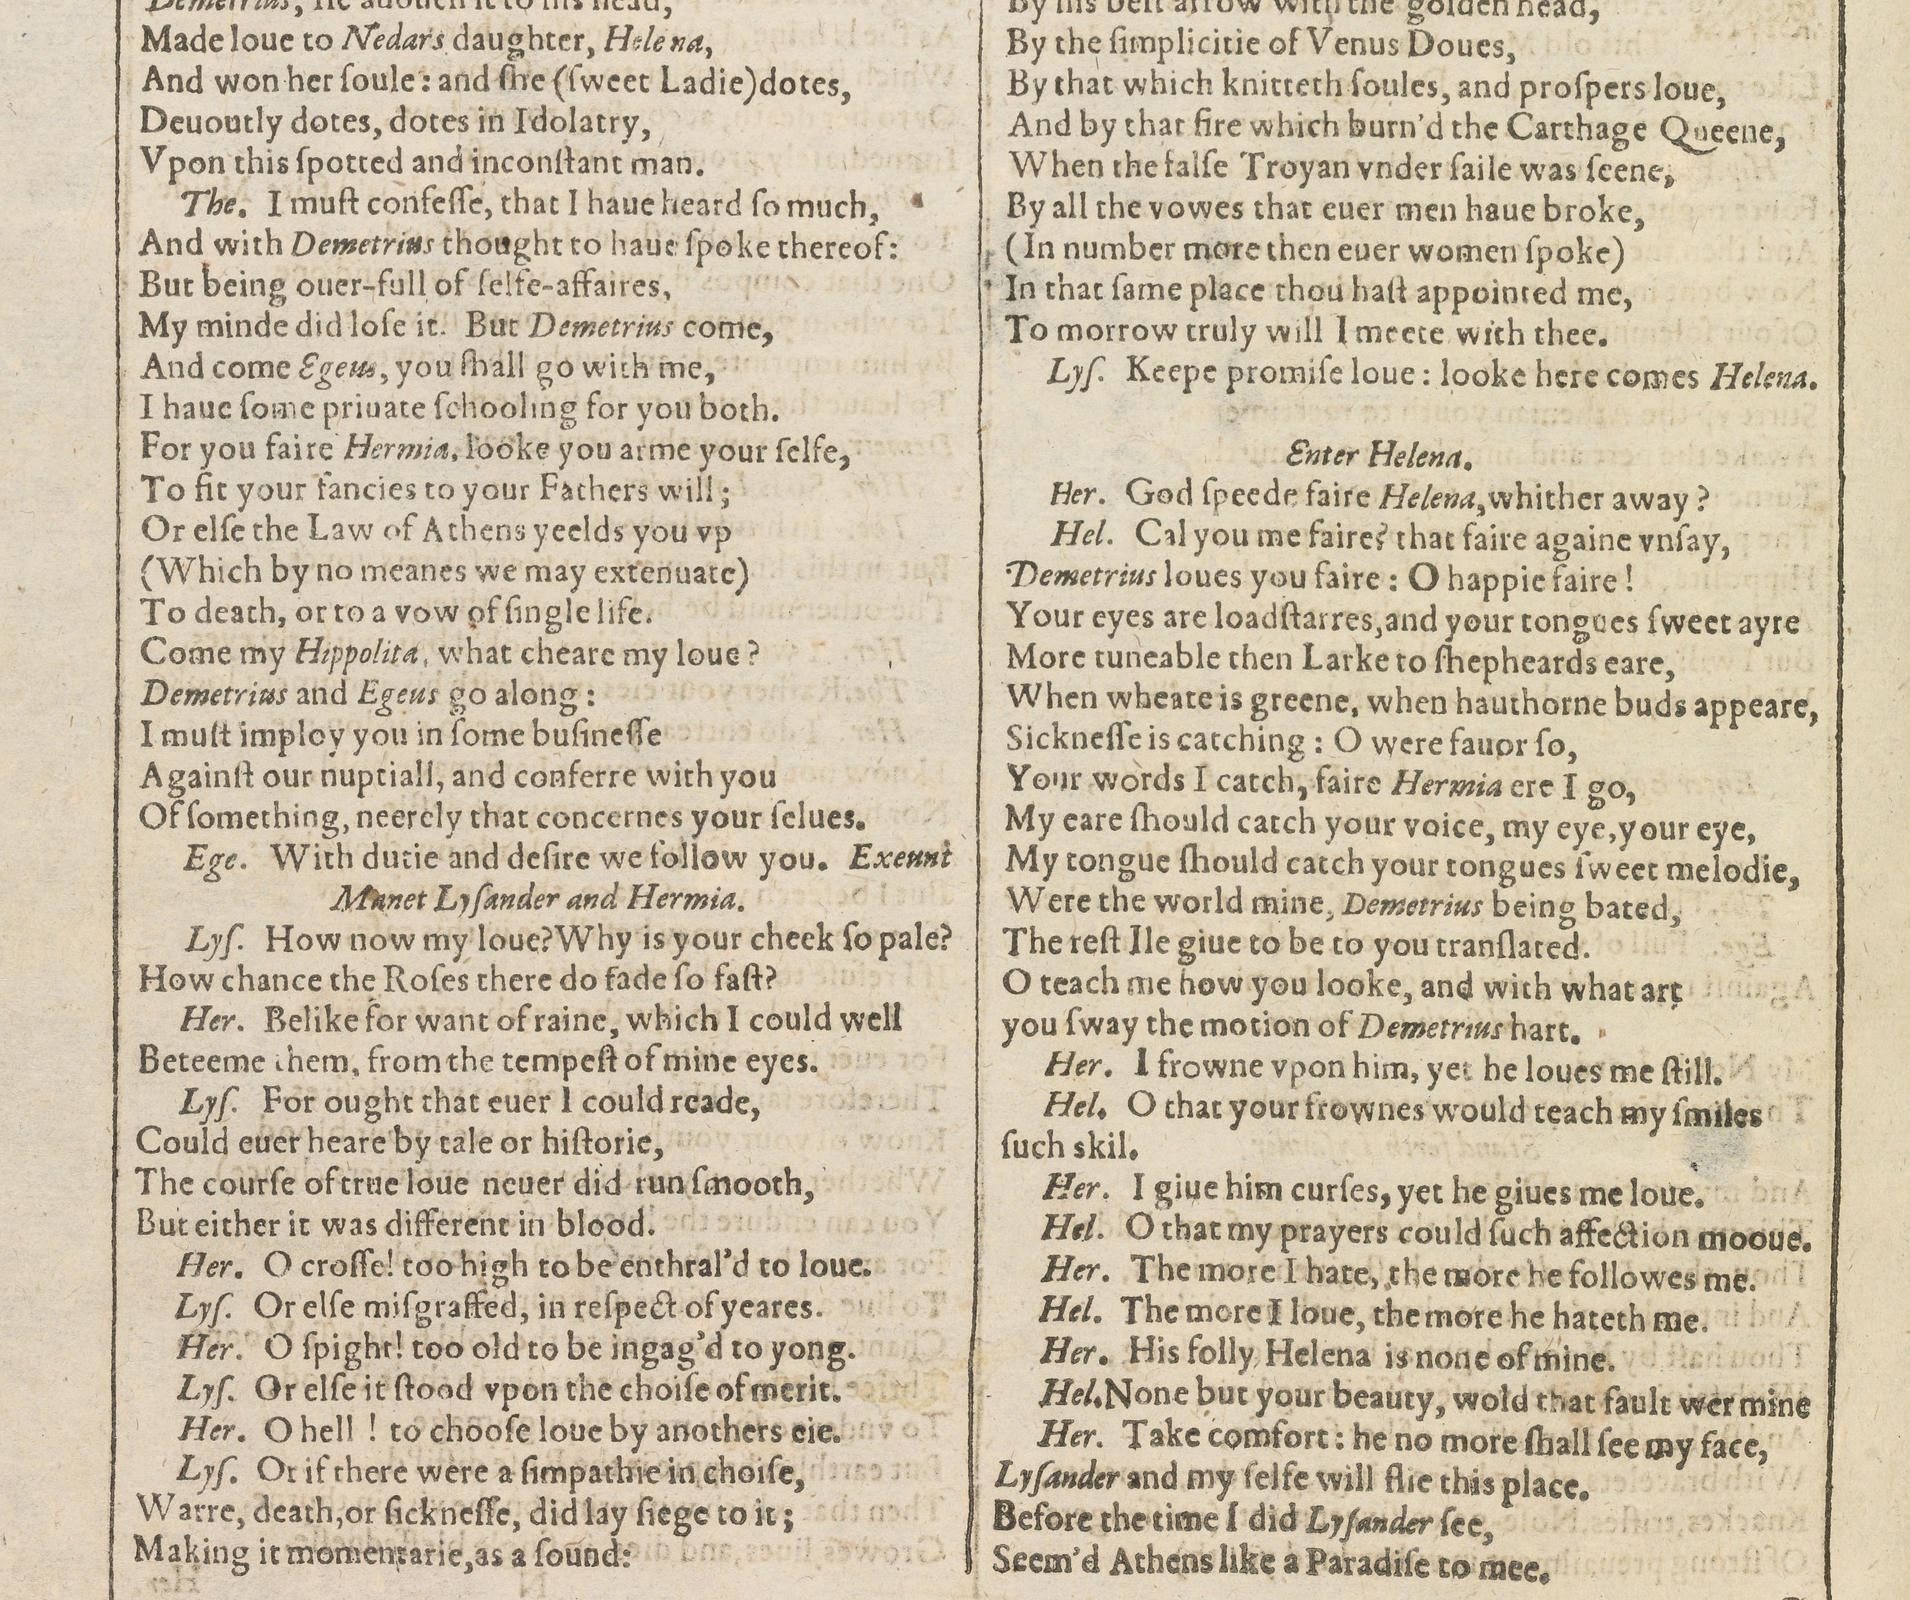
You will notice that the character name is abbreviated. We don’t want our modern version to emulate this. Some public domain texts (from which we work) also abbreviate the character name. We will need to use search/replace to change these. While we are here, we should observe also that the abbreviated character name is on the same line as the first line of the speech. More on this in a moment.
Other print editions also abbreviate the character name as in this school edition from the 1960’s.
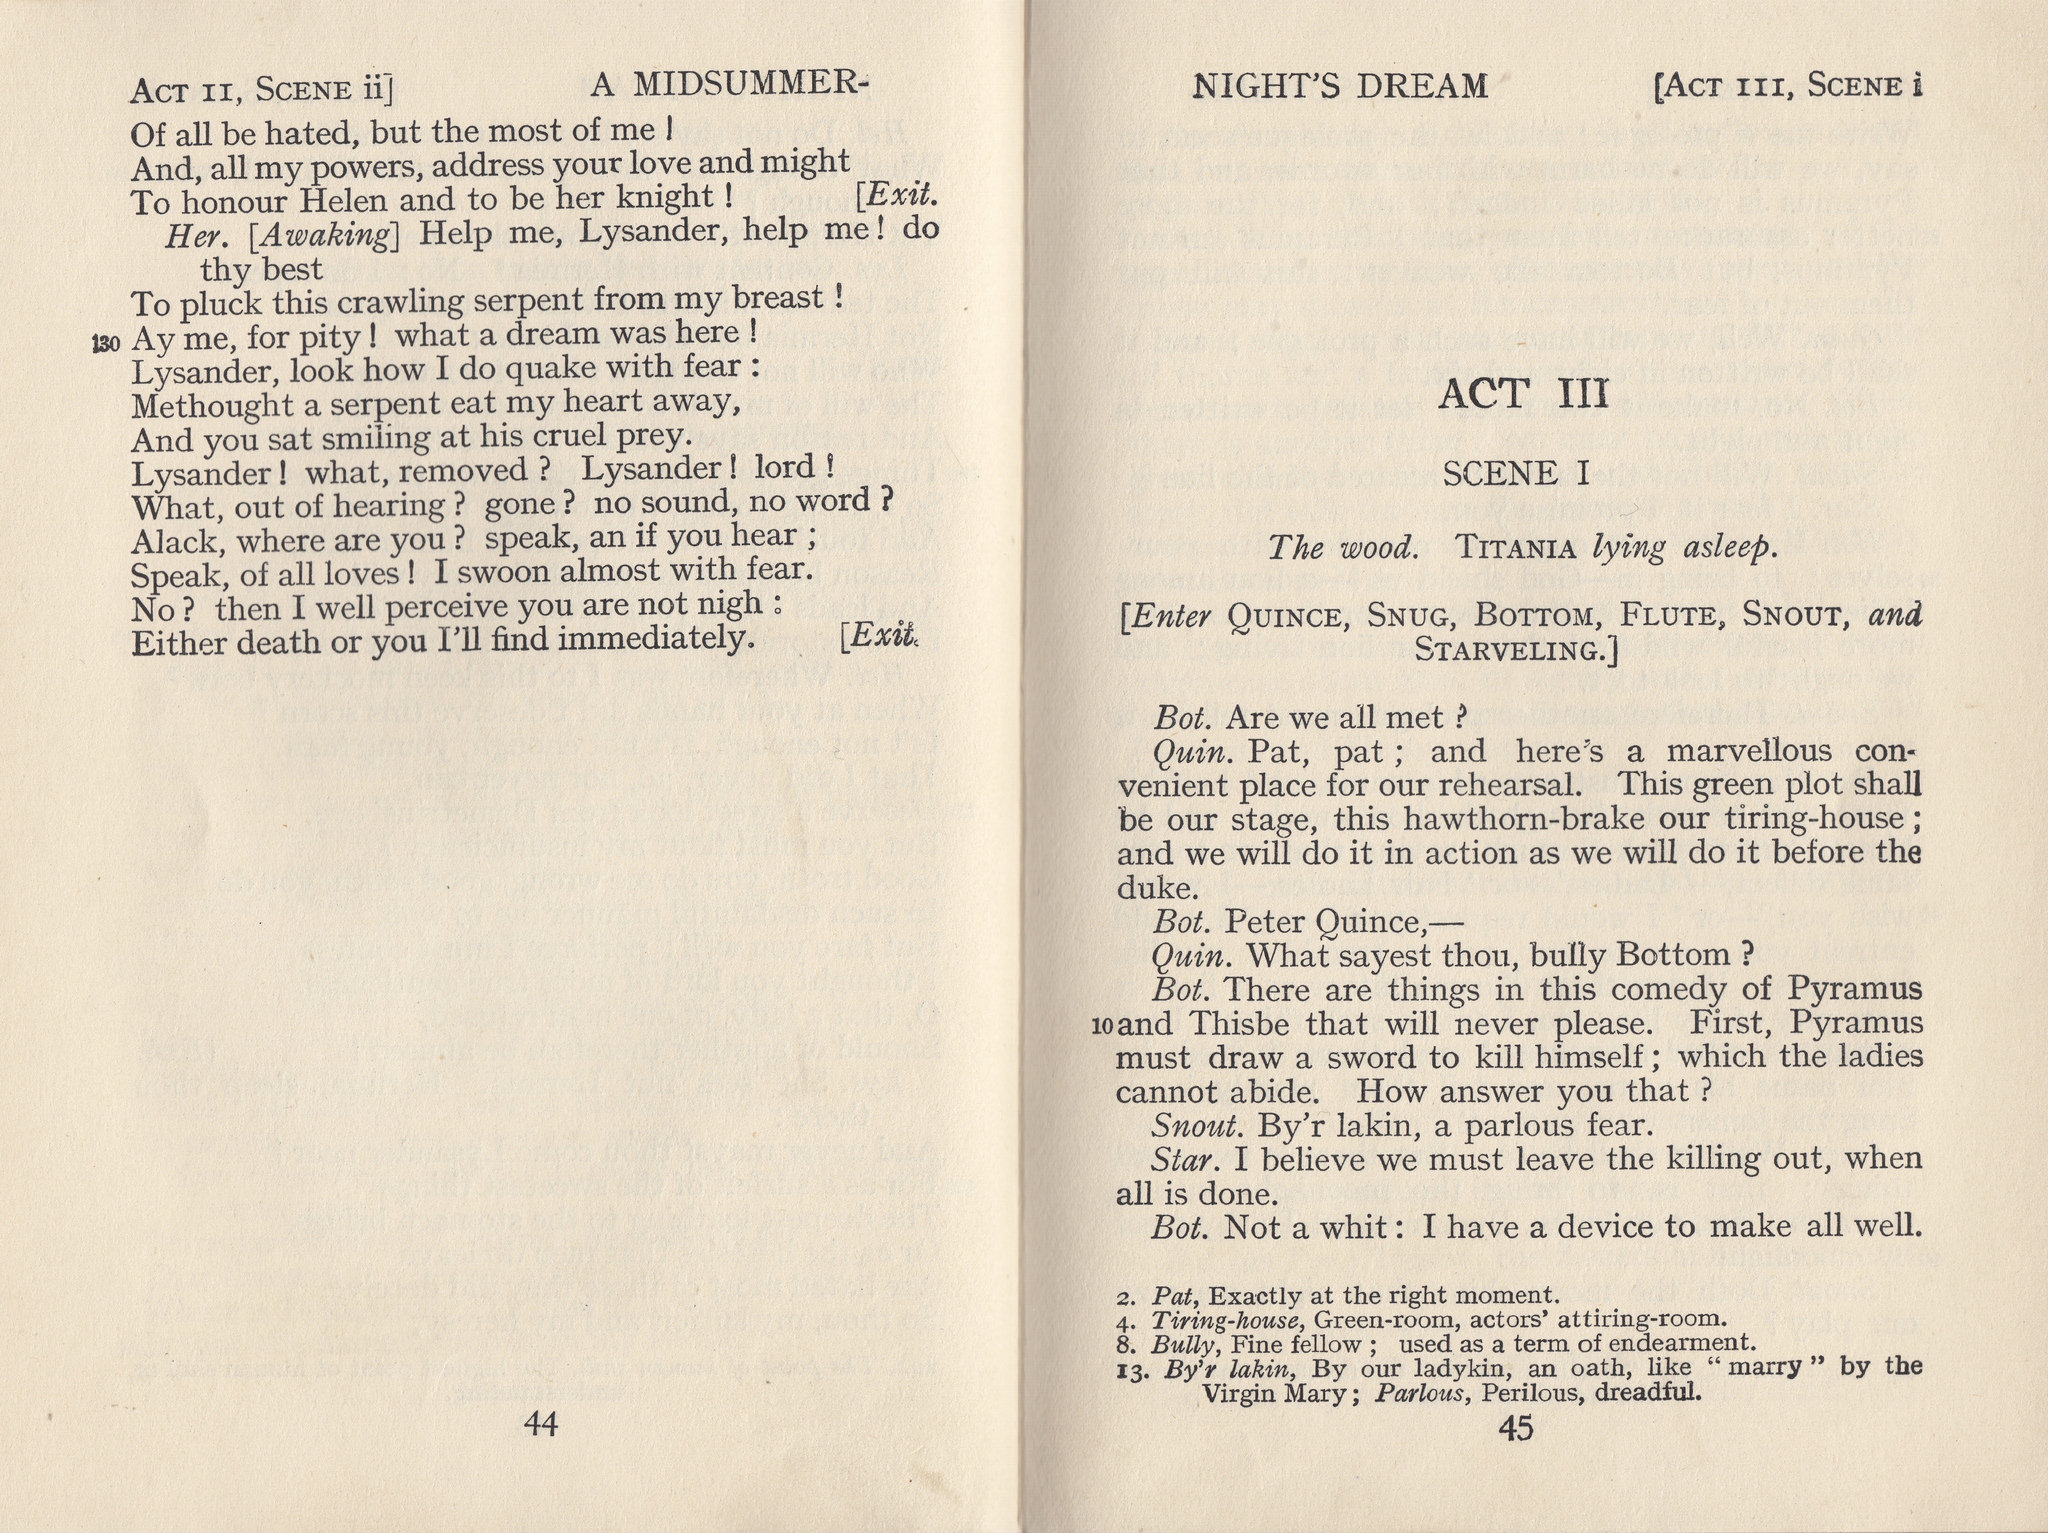
In the image below is a later educational edition of A Midsummer Nights’s Dream.
 In this example, we see that the character name is generally above the first line of the speech, however the typesetter in this case has put the character name on same line when the line is short.
I suspect that this must be a legacy detail when the text was set with lead type. We would find this detail difficult to style with a style rule in digital typesetting. The reason for this relates to how we decide to structure the verse lines; are they to be separate paragraphs or will they be separated as lines within a paragraph? The speech block can be a paragraph with individual verse lines separated by a forced line break. If this is the case then the speech block can be styled as a block with space above and below.
We will want to have as much presentation control of this character name as possible, so we should also avoid capitalised letters; we should use use title case. We can style as uppercase if we need, but, remember, if the digital text is using capital letters, then we cannot reverse this with a style setting.
In this recent edition of A Midsummer Night’s Dream, the character name is on the first verse line of the speech or the same line as the start of the prose speech.
We may prefer to keep each line in the speech block as a paragraph with a paragraph break at the end of each line.
Going back then to the structure and presentation of the character name, it will help us if this is a separate paragraph too, and not attached to the first line of the speech.
We explore later how we use Find/Change in InDesign to put the character name on its own line.
Prose or Verse
Some of Shakespeare plays use mostly verse spoken by the characters, whereas others use mostly prose. What is the difference from a presentation perspective?
Prose flows across the page and breaks when it runs out of space. It should only break to the next line if the speech ends.
Verse is deliberately broken at the end of the line and the next line will start with an uppercase letter. Verse may break before the end of the verse line if there is no more space; this usually only happens when the line is long or the font size is large.
Note: in eBook or web publishing text must be allowed to flow naturally when space runs out for the line. When this happens in a line of verse we want to see that the wrapped line is set in from the left edge.
Our text source
We are most likely to be working from a public domain text that has been scanned from print and there will be some changes to be made if this is the way we receive our public domain text. Here follows some issues that we will need to resolve.
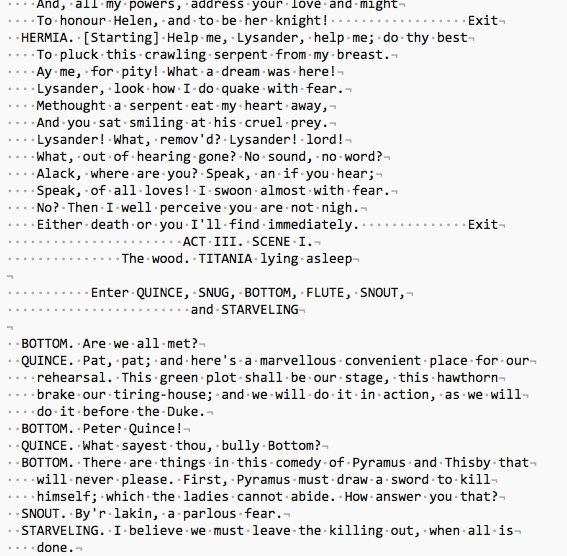
Scanned texts that are converted to digital text will have the presentation on paper reproduced in a digital form with lines breaking where the line breaks occur in the printed version. This means that we will need to remove these breaks otherwise we cannot guarantee that the text will flow properly and be responsive to different screen sizes.
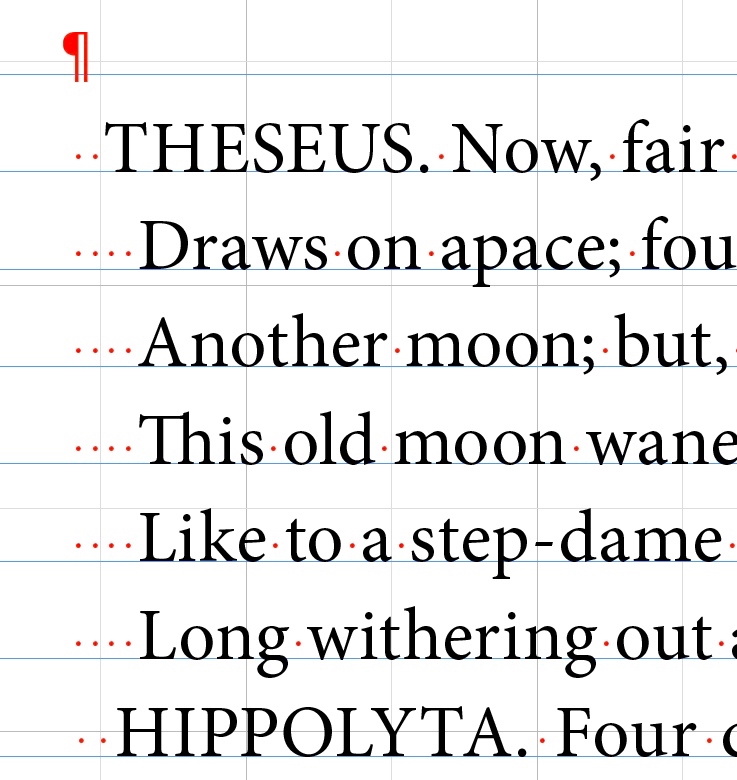
Here is a screen image of a typical downloaded version of A Midsummer Night’s Dream.
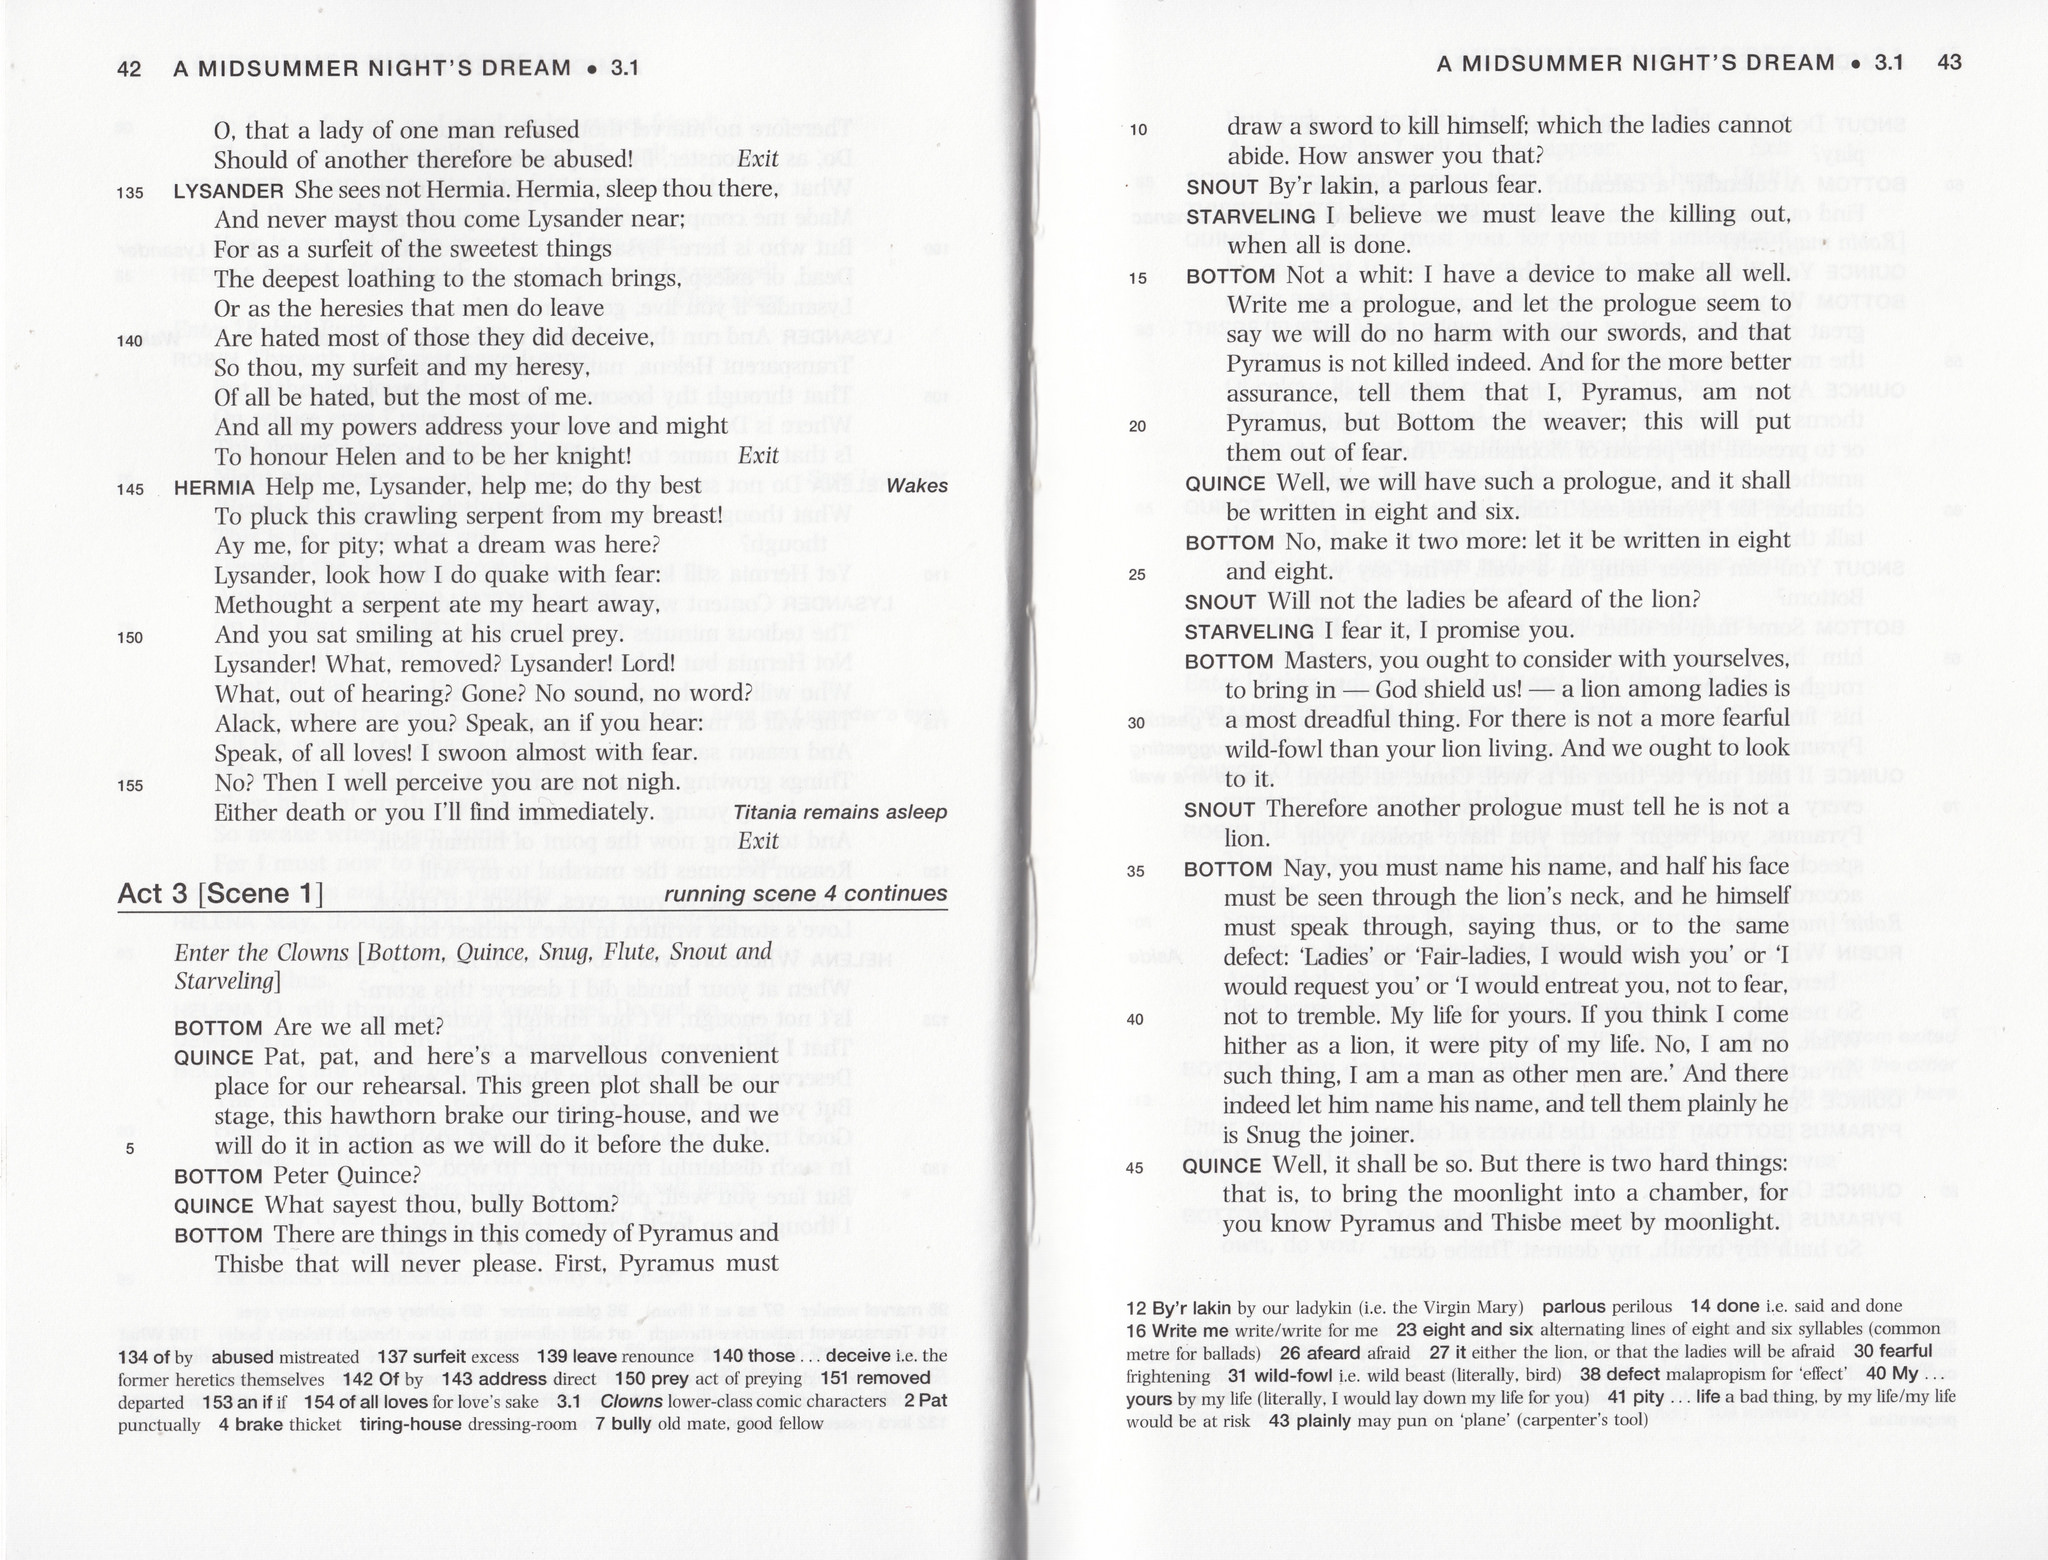
Line numbers
Some printed versions of the plays will include line numbers (see images above), usually ranged to the right of the line. There are some advantages to display the page number in an educational environment, because they can be a way to navigate to particular locations within the text as in Act 2, Scene 3. line 45. Not every line number is labelled, only every 5 or 10 lines typically.
The public domain sources that we use for our projects do not include the line numbers and so we don’t incorporate them in our work. However, this may be considered in the future.
Stage directions
Usually the main stage directions will take a complete paragraph. These might indicate the entry on the the stage of one or more characters. When characters leave the stage then, again we might have a stage directions that will use the word Exit for a single and Exeuntas the plural form.
There are also directions within the text. An inline indicator such as [Whispers] or [sings] does not always appear on it’s own line, but rather within the line or immediately after the character name.
Analysis of the raw text source
One of the first tasks for the students is to look closely at the public domain text that has been provided. As mentioned above, this will have been converted (by scanning) from a printed text.
We can use a text editor to make global changes to the text. We can use
search and replaceor even pattern matching withGREPhowever, there is a good reason to leave this process until we have the text in InDesign.
Our objective is to markup the text and we can achieve this by using InDesign to attach styles and then match these styles to the equivalent tags. We can use the search and replace with GREP function in InDesign to achieve this but first we need to create the styles that will ‘wrap’ the elements in the play. Make the style names as if they are valid XML tag names and our work is easier because we can match by name.
Reviewing the structure
Before we consider how the text will be styled we use the understanding of the elements just described to add markup to the text. A good way to understand the structure of the play is to consider each element and its relationship to the other elements.
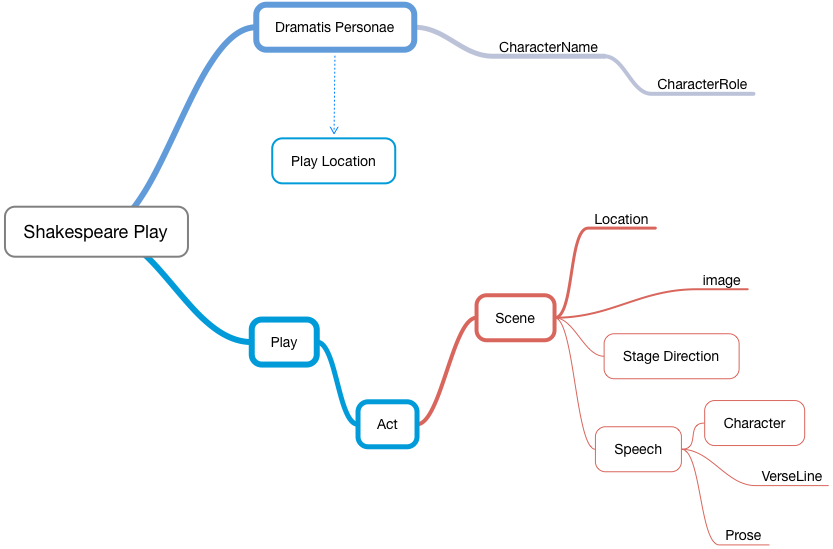
Let’s describe the rules for the play in simple English first:
- A list of characters in the play (dramatis personae)
- role in the play described
- A number of Acts
- A number of scenes in each act
- One location in each scene
- a number of stage directions in each scene
- a number character names in each scene that can be repeated
- a number of verse lines that follow a character name
- or - a number of prose paragraphs that follow a character name
- or - a number of song lines that’s follow a character name
- an inline stage direction within a verse line or within a prose paragraph
- A number of scenes in each act
The DTD (Document Type Definition)
We can create a DTD that represents the rule set of the Shakespeare play.
<!ELEMENT shakespeareplay (dramatis_personae?,play?)>
<!ELEMENT dramatis_personae (dramatis_head?,charactername+,play_location?)>
<!ELEMENT charactername (#PCDATA | character_role)*>
<!ELEMENT character_role (#PCDATA)>
<!ELEMENT play ((act,(((firstscene|scene)+,location?,(stage_directions|stage_action|character|prose|verseline|song)+))*)*)>
<!ELEMENT location (#PCDATA | scene_image)*>
<!ELEMENT dramatis_head (#PCDATA)>
<!ELEMENT play_location (#PCDATA)>
<!ELEMENT act (#PCDATA)>
<!ELEMENT firstscene (#PCDATA)>
<!ELEMENT scene (#PCDATA)>
<!ELEMENT stage_directions (#PCDATA)>
<!ELEMENT stage_action (#PCDATA)>
<!ELEMENT character (#PCDATA | stage_directions_inline)*>
<!ELEMENT prose (#PCDATA | stage_directions_inline)*>
<!ELEMENT stage_directions_inline (#PCDATA)>
<!ELEMENT verseline (#PCDATA | stage_directions_inline)*>
<!ELEMENT song (#PCDATA)>
<!ELEMENT scene_image (#PCDATA)>
<!ATTLIST scene_image href CDATA #REQUIRED>
<!ATTLIST shakespeareplay title CDATA #REQUIRED>
Why use the DTD?
The reason we use a DTD is that we can import this into InDesign and it will automatically create all of the elements as tags.

Once we have the tags in InDesign we need to create the paragraph and character styles to match these tag names.
There is no automatic way to create styles in InDesign from tag names, so we provide a template that includes these styles. These are in name only and the template is deliberately set up to use primary colours and basic fonts, so that the students will need to use their own judgement and design skills to build attractive settings for their chosen play.
The template includes placeholder text for all of the elements needed.

The template is setup with 2 text boxes, one for the dramatis personae and the other for the play itself. In other words these text boxes are not joined or threaded.
The template provides the agreed page size for this book: 129mm x 198mm (B format) with a bleed of 3mm. Although the margins are set, the students can alter these before placing the text.
Placing the text
The texts that we use are all generated originally from print versions and so have a similar raw state.
Although we could edit this text before we place in InDesign to remove unwanted spaces and paragraph breaks, it is better to leave these features in and use the repeated patterns to help in match these in search and replace techniques within InDesign.
Attaching the styles to the text
One we have placed the text into InDesign then we can analyse the patterns and use this in formation to make changes and at the same time select the appropriate style.
We can also use GREP in our search and replace.
Pattern matching strategies
You can see from the image below how the text is presented when unstyled; we should always turn on show hidden characters. See how the character name before the speech has 2 spaces at the beginning, is a run of capital letter, followed by a period and a space. This we can use to locate every one of these and thereby add a paragraph break after and apply the appropriate style.
There are some issues and disappointments
- We cannot change the case of the found text with this technique (we can only do this with a script) - solution described later.
- When we add a paragraph break and change the paragraph style of the found text, it will also be applied to the following paragraph (the first line of the speech). Resolving this is achieved by using 2 stages.
- We need to look carefully at our play text to see if there are characters that have more than one word like ‘First messenger’.
GREP (Globally Search a Regular Expression and Print)
Certainly the most challenging aspect of this for our students is understanding the concepts and syntax of regular expressions. InDesign is very helpful in this regard, because choices can be made by selecting for the comprehensive menus. I do provide some ‘ready-made’ code to add to the search field, because nesting repeats and using multiple stages is hard to understand at first. But these are our tools and we must learn how to use them!
Consider the steps to deal with the character name before the speech (as seen in the image above).
The Search
The GREP search will look for the following broken down into these steps:
- The beginning of the paragraph
- one or more spaces
- an uppercase letter
- another uppercase letter (this insures that we don’t pick up
IorA) - a repeat of this one or more times
- a period
- a space
The GREP (InDesign syntax) for this looks like:
^ (\u\u+)\.\s
This works for character names that have one word, but what if we have ‘First Messenger’ or ‘Second Witch’? Here is a better solution to capture those as well:
^ \<([\u\u+? ]+)\.
This will capture names with more than one word with a space between (notice the square brackets).
The Change to …
Ideally we want to:
- Remove the space at the beginning
- remove the period and the space at the end
- add a paragraph break at the ends
- change the style to the appropriate paragraph style
- change to title case from uppercase
Number 5 cannot be done here, we need a script for this; but since we want to change all uppercase words to title case, this can be done globally later.
Number 4 cannot be done in the first step, because in adding the paragraph break we will accidentally change the following line also.
Note: This seems to be a bug in InDesign because if you find and change one item, the following line does not get restyled, but with
Change Allthe following line will be changed as well.
Our find and change dialogue in InDesign should look like this:
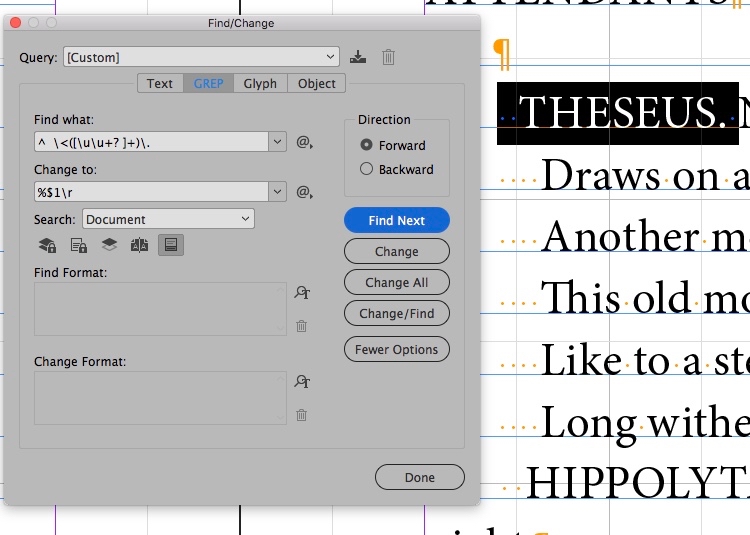
We can type in the GREP code although InDesign helps you by providing the menu choices like this:

The change to field has this:
%$1\r
Add a percentage sign, add the found text in the standard brackets, add a paragraph break.
By adding the % we can now use find a change again and this time change the style at the same time.
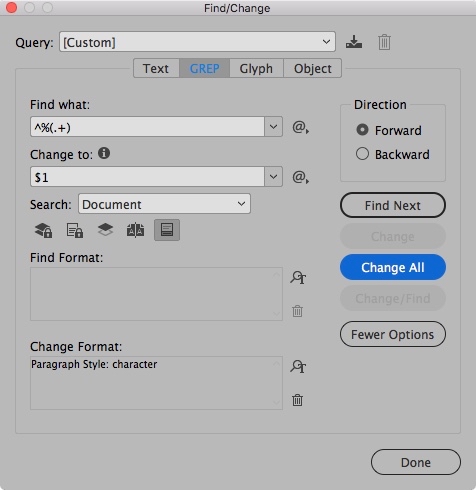
More fun with the GREP
We now will need to analyse the other patterns and work out strategies for the stage directions, the Act and Scene headings and devote some time to the Dramatis Personae. Our objective is to apply the named styles to the various elements throughout the play and also to remove empty space.
From uppercase to titlecase
To change the uppercase words into we need to use a script. I should give credit to Peter Kahrel for providing this script:
InDesign and XML
Publishing students need a basic understanding of XML and marking up a logical structure of a Shakespeare play provides a good introduction. The relationship between XML and InDesign5 is not ideal, but for us we can export XML after having applied the styles at object, paragraph and character level correctly and use the XML output as a way to check the correct use of these styles.
Exporting the XML from the Shakespeare play is one of the early assignments and is assessed with the following in mind:
- Everything must be marked up with no text left outside tags
- There should be no empty tags (this will indicate empty paragraphs)
- The structure should be clear from the root through to inline tags.
How do we get XML out?
If we follow along with the processes described above then all text will have the styles applied (even though the presentation is not what we want yet). The trick now is to match the styles with the tags and we do this with Map Styles to Tags.
We then export the XML and this a small snippet of the result.
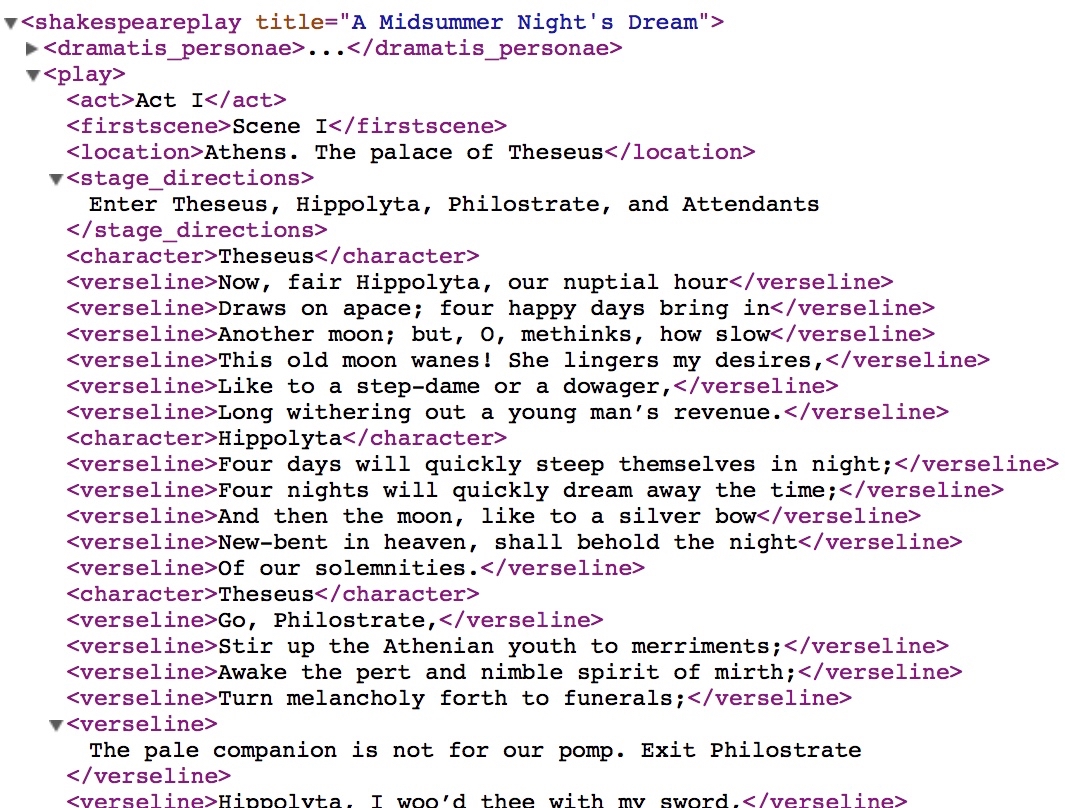
By evaluating the XML we can be sure that the InDesign document conforms to the structure and everything is set with a style. Now the students need to hone their design and typography skills to present the play in the best way; styles now need refined attention to detail and visual clarity applied.
Final steps
- images are added
- an introduction added from the Life of Shakespeare (public domain text is used)
- prelims added half title frontispiece title page imprint page table of contents
- extent adjusted to be divisible by 16
- PDF output ready for print with crop marks
In the next article we will be looking at how the students take this content and deliver as a web site and then various eBook formats.
Related documents on my site
Screencast: Structure, Tagging and Export to XML
Further Reading
Kastan, D. S. (2001a) Shakespeare and the book. Cambridge: Cambridge University Press.
Bringhurst, R. (2012) The elements of typographic style. Fourth edition (version 4.0), Twentieth anniversary edition. Seattle: Hartley & Marks, Publishers.
Peter Kahrel (2006) Automating InDesign with regular expressions. [Sebastopol, Calif.]: O’Reilly.
-
Hamlet ↩
-
See Book Typography: a designer’s manual, Mitchell and Wightman, 2005 ↩
-
Folger image collection is a good source. https://luna.folger.edu ↩
-
The Bodleian First Folio - http://firstfolio.bodleian.ox.ac.uk ↩
-
Maivald, J. J. and Palmer, C. (2008) A designer’s guide to Adobe InDesign and XML: harness the power of XML to automate your print and web workflows. Berkeley, Calif: Adobe. ↩