On this Page
From InDesign to HTML and CSS
When we export InDesign to ePub, content is marked-up as HTML and styles are converted to CSS. We can also export to HTML and same thing happens, but what should we do to make sure our HTML and CSS are perfectly formed and can also (if needed) be edited.
Introduction
In this detailed description, we are going to use our Shakespeare play to create a single web page but with an interactive navigation block that will help is locate the Acts and Scenes.
From Styles to Markup
Of course we have developed good habits and have made sure that all content has styles attached. we avoid overrides and adjusting appearance with bespoke settings. We also avoid adding empty paragraphs to achieve space. Once we have our styles applied (paragraph, character and objects) we then need to instruct InDesign what HTML tags to apply to those elements on export.
Build the Table of contents
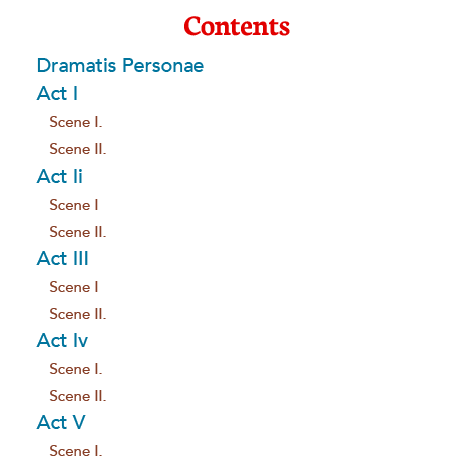
If you don’t have a TOC then get InDesign to build one. You don’t need to worry about how this looks but use an unordered list to style. You’ll need the nesting sorted (Scenes inside Acts).
Let’s take a moment to explore the concept of lists— both in InDesign and HTML.
Lists in InDesign
In InDesign we would use a bulleted list, although we do not need to style with bullets, but we do need to construct as a structure so that the items follow along and are indented if they are sub listed items. In our Shakespeare play example the Scene is a sub-section of the Act, so in our table of contents (TOC) we will want to reflect this structure; we normally do this by indenting the second level further than the parent level like this:
1
2
3
4
5
6
7
Act I
	Scene I
	Scene II
Act II
	Scene I
	Scene II
	Scene III
We can achieve this structure by making sure that the Act is set at level 1 and the scene (also firstscene) is set at level 2.
When we export to HTML (File > Export > HTML), we need to be sure that our lists are exported as HTML lists.

Lists in HTML
In HTML the unordered list is presented with the following tag structure.
1
2
3
4
5
<ul class="contents">
	<li>some item</li>
	<li>another item</li>
	<li>yet another item</li>
</ul>
So, <ul> is the parent and <li> are the list items.
Because the Scenes are one level below Acts, the structure should look like this:
1
2
3
4
5
6
7
8
9
10
11
12
13
14
<ul class="contents">
  <li>Act 1
    <ul>
      <li>Scene 1</li>
      <li>Scene 2</li>
    </ul>
  </li>
  <li>Act 2
    <ul>
      <li>Scene 1</li>
      <li>Scene 2</li>
    </ul>
  </li>
</ul>
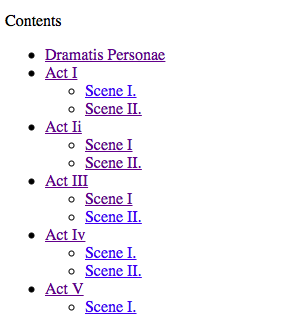
Here is what our HTML list looks like in it’s raw state.
Interactive TOC
Because we built this list using the table of Contents feature of InDesign, the results that we get in the HTML also include the hyperlinks to the appropriate places in the text. Here follows a short example from the HTML markup, with some tidying to make easier to understand.
1
2
3
4
5
6
7
8
9
10
11
12
13
14
15
16
17
<nav id="_idContainer000" class="contents">
<ul>
	<li class="toc_act"><a href="play.html#_idTextAnchor000">Dramatis Personae</a></li>
	<li class="toc_act"><a href="play.html#_idTextAnchor001">Act I</a>
	 <ul><li class="toc_scene"><a href="play.html#_idTextAnchor002">Scene I</a></li>
	 <li class="toc_scene"><a href="play.html#_idTextAnchor003">Scene II</a></li>
	 </ul></li>
	<li class="toc_act"><a href="play.html#_idTextAnchor004">Act II</a>
    <ul><li class="toc_scene"><a href="play.html#_idTextAnchor005">Scene I</a></li>
	 <li class="toc_scene"><a href="play.html#_idTextAnchor006">Scene II</a></li>
	 </ul></li>
	<li class="toc_act"><a href="play.html#_idTextAnchor007">Act III</a>
    <ul><li class="toc_scene"><a href="play.html#_idTextAnchor008">Scene I</a></li>
	 <li class="toc_scene"><a href="play.html#_idTextAnchor009">Scene II</a></li>
  </ul></li>
</ul>
</nav>
Now that we have resolved the interactive table of contents we should now look at the other elements in InDesign and how we turn these into correctly formed HTML.
HTML tags
You should know what HTML tags can be used. Please do read up on the basic introduction to HTML and CSS, because you will need to configure each style to use a particular tag; inline tags such as <em> and <strong> or block level tags like <h1> and <div>.
In the style settings for each element (paragraph or character), there is a section Export Tagging.
We can makes this setting for each style in turn or we can use the InDesign panel for Edit All Export Tags that helps us makes these settings in one place.
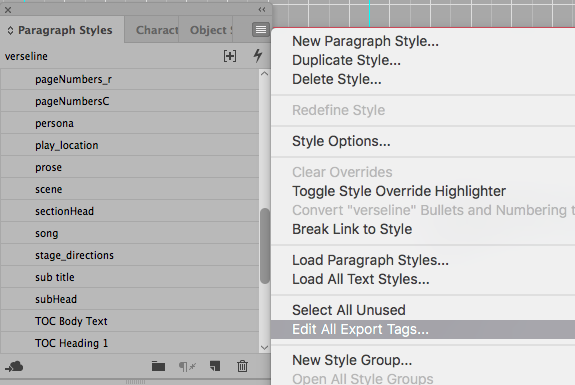
You can go through all of the styles and make sure that you set an appropriate style and class name. If you leave this to InDesign then you may find that you have problems later when you try to edit the style with CSS.
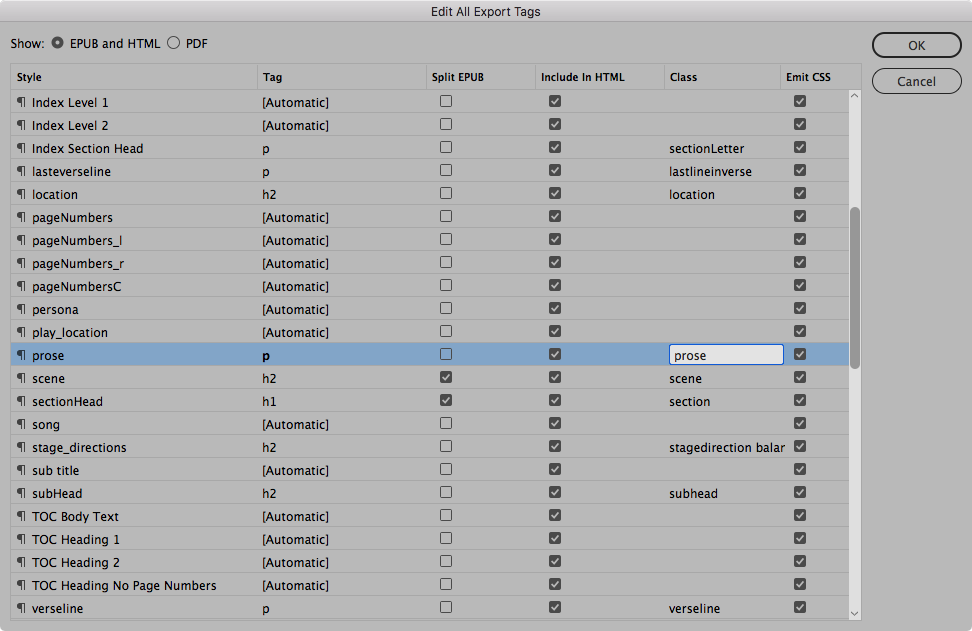
Class names
HTML tags can also have class names that will give us even more control over the styling in the web page that we are going to construct.
Export to HTML
There are a number of settings to go through when we choose to export the InDesign document to HTML.
For this project we will base the layout on the XML structure and so we must make sure that the newly added table of Contents is included in the XML structure by mapping the Style to the Tags once more with the new list styles mapped to an appropriate tag.
In the third panel of the Export to HTML we will need to choose a CSS file that we can edit and turn off the one that InDesign generates.
The CSS is provided here as a GitHub Gist
HTML and CSS
Styles are applied to HTML Elements with CSS rules
InDesign Styles become HTML tags
- Paragraph styles become block level tags such as
<p>,<h1>and<li> - Character Styles become inline tags such as
<bold>and<span> - Object Styles become box elements such as
<div>and<section> - Table styles will become HTML tables with
<table>,<td>and<tr>
Not to Forget
Make sure that you set the Export Tagging for each paragraph, character and object styles, so that you can control the CSS styling after exporting.
The table of contents should be in it’s own text frame and this should be exported with nav as the export tag. The list items in the TOV should use toc styles but set the tags for those as <li>.
Master Page items?
You can ignore whatever is on the master pages; page numbers and running headers will not appear in the HTML export.
Filed under: InDesign, XML, HTML and CSS, Multi-Platform Publishing
This page last edited on: 2020-01-15