On this Page
Create XML from InDesign
Tags, Structure and Styles - Extracting XML from InDesign depends on a number of factors, but if we successfully achieve our goal then we can be pleased that we have styled all of our content and mapped these styles to our document structure.
What is XML?
XML is eXtensible Markup Language and is a non-proprietary markup language that can be used as a future-proof way to store content. XML indicates structure rather than style; in fact XML includes no information about appearance, only structure, hierarchy and element taxonomy.1
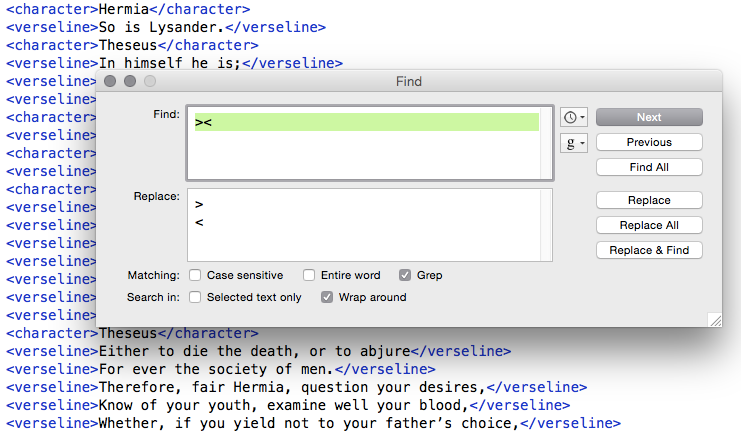
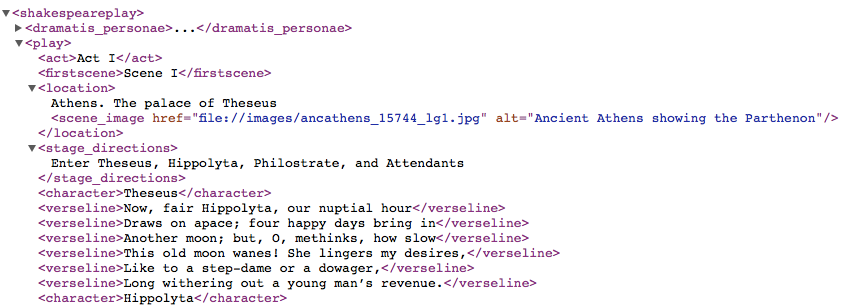
Here is a sample of some XML of ‘A Midsummer Night’s Dream’:
1
2
3
    <stage_directions>Enter Egeus</stage_directions>
    <character>Egeus</character>
    <verseline>Happy be Theseus, our renowned Duke!</verseline>
Tags
What we see in this example are various elements of the content surrounded by the markup using tags that (effectively) label the content as to its meaning in the structure.
For example <stage_directions> marks up the text that is identified as just that; stage directions.
The naming convention for tags is quite strict and you cannot use spaces in the names, nor can you start a tag name with a number. Certain other characters are not allowed; ampersands, exclamation marks, brackets etc. Also, XML will notice the difference between upper and lower case letters, so <StageDirections> would be different from <stagedirections>.
How do we create Tags?
With InDesign there are 2 ways that we can create the tag names. One way is to simply add them to the tags panel, one at a time. The Tags panel is found in the menu Window>Utilities>Tags.
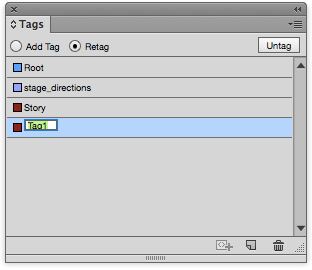
When naming tags we need to be aware of the kind of content that we have so we can label the tags appropriately.
Another way to add tags to the tag panel is to load them from somewhere else.
InDesign is clever enough to be able to load the tag names from an XML document. It will locate all markup and make the tag names. Another way is to load a DTD)Document Type Definition — this will also generate the tag names. Loading a DTD will also effect the Structure panel, but we will explore this later.
Tag names and Style names
And this is the crucial bit that helps us generate the XML!
Ultimately, the styles (paragraph and character styles for the moment) need to be ‘mapped’ to the tags. Of course, it is very likely that the elements in our Shakespeare play will be styled differently; character names to look different from stage directions and so on. So, structuring the play is very much tied to how we as typesetters want our play to look.
We should be aware though, that the typesetter may want the stage directions to look the same as the character name (strange, I know) but we should try to give those elements different tag names (and thus style names), so that future editions could easily be re-styled from the XML data.
What is the difference between style names and tag names?
If you have already done work with InDesign, you will know that style names (character, paragraph and object names), can have descriptive names such as ‘top red heading’, or ‘underlined sub head 2’. While this may be something that you have got used to, I want to politely suggest that you name the styles the same as you would if you were marking up with XML. In other words, think of a term that identifies its purpose and meaning, rather than its appearance.
As you will see in a moment, we can map the styles to tags and select each pair in turn, but if the names of styles and tags are the same, then InDesign will map them automatically for us. Cool!
The Structure Pane
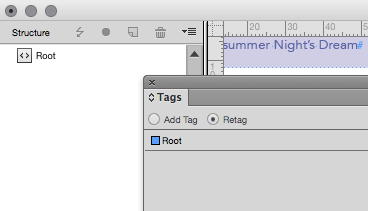
Before we go any further with this, it’s time to introduce the Structure Pane.
Go to the menu View>Structure>Show Structure
What you see is a pane on the left with one item in it called Root.
Every document will have a root.
From the Structure pane we can also load a DTD. From the top right of the Structure Pane, a drop down menu offers the option of loading a DTD. The result of this operation is that the Tag window is then populated with the the Tags identified in the DTD.

The DTD that has just been loaded looks like the image to the left.

A DTD (Document Type Definition) is a set of rules, that sets out what tags can be used in the XML and how they should be arranged in the hierarchy.
Do I need to use a DTD?
It is not required that you use a DTD at all. If you want to add tag names to the Tags panel one at a time, this will also work. If you do it this way, then you need to produce a Tag for each element type in the play; characterName, prose, stageDirections — or whatever you wish to call them. You need to analyse the text so that you can create tags that match the content.
Mapping Styles to Tags
Once we have our play styled using character and paragraph styles (appropriately), and we have a set of tags that define those same elements, then we can ‘Map Styles to Tags’.
As you will see from the dialogue box here, there is an option to ‘Map by Name’. This will, of course, automatically get the mapping done if the names are the same! I mentioned that before didn’t I? Not to worry, if you didn’t name the same, because you can go through each one and select the tag name to the appropriate style.
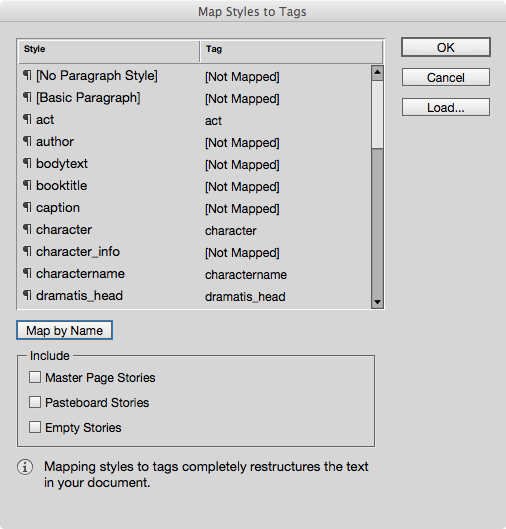
You will notice here that not all Styles are matched to Tags. This is because some of these tags are ‘Parent Objects’. InDesign does not map objects through the ‘Map by Name’ button, so we need to do this through the structure pane.
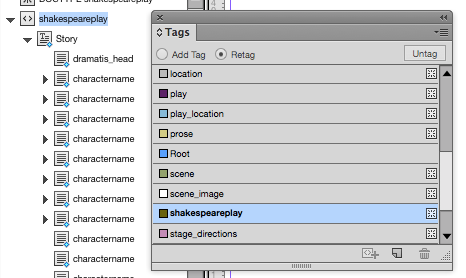
The structure pane after mapping the tags to the styles is seen here.

The Root and the Story
In the Structure Pane, you now see that we have a ‘Story’ inside the ‘Root’, and then other components inside the Story.
In my example so far, I only have one ‘Story’. All of my text was ‘Placed’ and is threaded together. Later, we will look at breaking the one Story into parts.
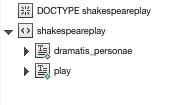
To make our XML structure correct, we need to make the Root element become shakespeareplay and our one story ‘play’. We do this very easily by selecting ‘Root’ in the structure pane and then click once on shakespeareplay in the tag window.
Same with ‘Story’ and the tag ‘play’.
Split the Story (if you need)
If you want to break the story (all threaded in my example), so that the Dramatis Personae is in a separate parent tag, you can use a Script that comes with InDesign.
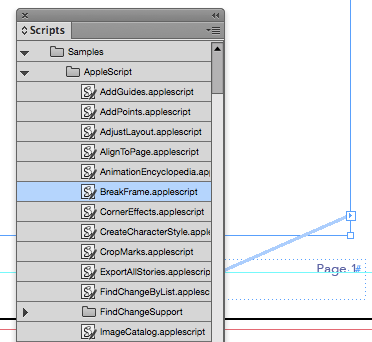
In the Scripts panel (Windows>Utilities>Scripts), you will find a script called ‘breakframe’ under the Samples section. Select the frame that you want to break and double click the script. You now have a separate threaded story.
This will also be tagged as ‘play’ so select it in the Structure pane and click the ‘dramatis_personae’ tag. It may be in the wrong order — coming to the end of the structure. Simply drag it up in the Structure pane.
Save your work!
Exporting the XML
You can Export XML from the menu on the Structure pane or from the InDesign File>Export menu.
The options are these.

If you have used a DTD then you can include a reference to it in the XML. Viewing the XML can be done with various programs but we will deal with that afterwards.
Inspecting the XML
We can view our XML with a web browser such as Safari or Google Chrome.

Editing the XML file
We can view and edit the XML file with a text editor such as Textwrangler, but when we view with this program we will notice that the text has no line breaks. To help see the way the XML is structured, you can put a break between the closing and opening tags.
What might be wrong with the XML?
You will need to check for two possible errors.
Untagged Content
If you notice content that is not tagged, then it could mean that you have not used a style for that content. On the other hand, maybe you did not map one style to a tag.

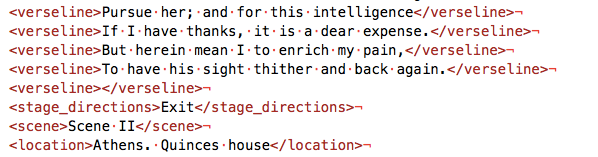
This portion of XML shows that the word ‘Exit’ is not tagged.
Empty Tags
If you find an opening and closing tag with no content between those tags, then you have empty paragraphs.2
This section of XML shows that there must have been an empty paragraph before the stage directions.3
Fixing Errors
Of course you can edit the XML, but it is better to go back to InDesign and make these corrections there and then re-export.
Forced line breaks
Force line breaks (sometimes called ‘softbreaks’) are achieved by using SHIFT-RETURN. They are sometimes used to keep text within a paragraph or heading, putting the line down on the next line. If you are trying to give your headings a more even horizontal distribution then you might try using ‘Balance Ragged Lines’ within the ‘Indents and Spacing’ section of the paragraph style. If you do use a forced line break then we need to be aware of the results in the XML export.
What happens to forced line breaks within the XML?
It depends on 2 things!
When you enter a forced line break between 2 words, you might be inclined to remove the space.
If you do so, when you export to XML, the forced line break will not be tagged and the 2 words will not be spaced (putting them together!).
However — if on export to XML you select the Remap Break, Whitespace and Special Characters, checkbox, then the ‘forced line break’ will be replaced by a space.

On the other hand, if you make sure that you have both a space and a forced line break, this will not be necessary.
Illustrations
For pictures, and images to appear in the correct location for the XML, you must be sure to anchor them.
How to anchor images.
The important thing to remember, is that this process is more about the flow of the document rather than the appearance, so we cannot just place the images anywhere and expect them to appear in the right place within the text. The images need to be ‘anchored’ correctly.
Place the Image on the Pasteboard first
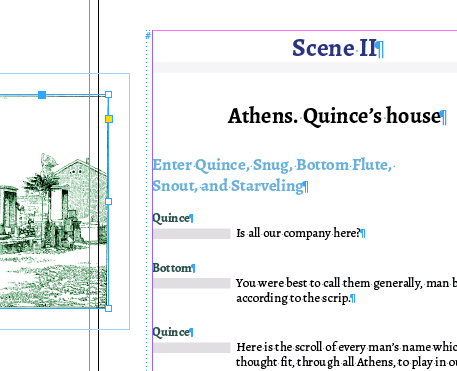
In my Shakespeare play book I plan to put a different images with each scene. I intend to place this image below the scene location and before the start of the first stage directions.
Here we see the image on the pasteboard. Notice the small solid blue square on the border of the image. We need to SHIFT-drag this to the end of the line ‘Athens. Quince’s House’. This will anchor it at this point in the text and you should notice an ‘anchor’ symbol in place of the small blue square. Anchoring images may also involve selecting the Anchored Image Options menu item under the Object menu, but for now, we will create a style that will be consistent for all images.
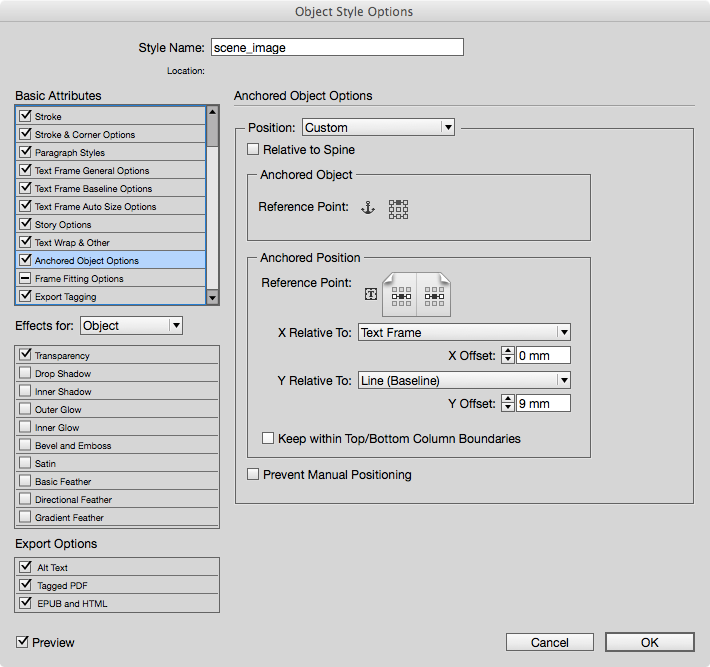
Now we need to create an Object Style for all images that will follow the scene title.
Object Styles
Object styles are a very powerful feature of InDesign, and allow you to apply formatting to various attributes of the object.
With the anchored image selected, find the Object panel, and create a new object style. I will name mine ‘scene_image’. The important style attribute for now is the Anchored Image Options section. You should select ‘Custom’ rather than ‘Inline’.
Tagging Objects
InDesign does not offer a way to automate the mapping of object styles to tags, so we need to select our graphic object (currently using the “scene_image” object style), and then select the tag: ‘scene_image’.
The object will then appear in the structure pane at the appropriate place.
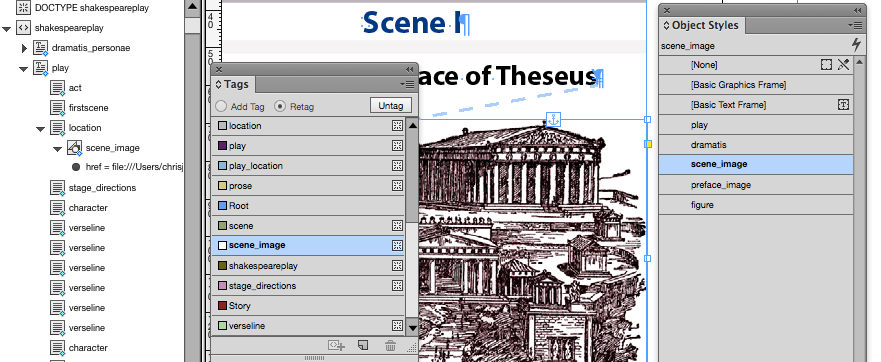
Here we see the image anchored with the object style selected in the object styles palette and the tag selected in the tag window.
We can then add the attribute ‘alt’ to this element in the structure panel.

Filed under: InDesign, XML, Design and Production
This page last edited on: 2017-11-22