On this Page
Text to InDesign
Processing the Text and applying styles with Find and GREP
When working with text from sources outside InDesign, we are likely to find that we want to make changes as soon as we ‘place’ in InDesign.
Our example is a public domain text (Shakespeare play) that has been created by scanning printed pages. This means that the text is a facsimile of a printed version. What we will find in the text are lots of spaces that move the text across the page and paragraph breaks where lines were artificially broken at the end of a line.
Un-styled text
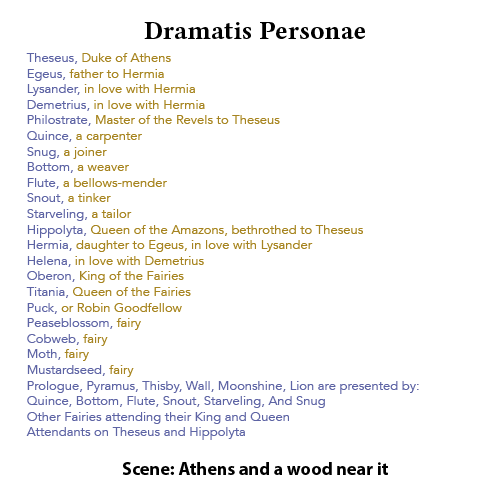
For my example I am working on ‘A Midsummer Night’s Dream’.1 I have collected my text and I need to keep the original somewhere and even research how the the play is displayed in print.
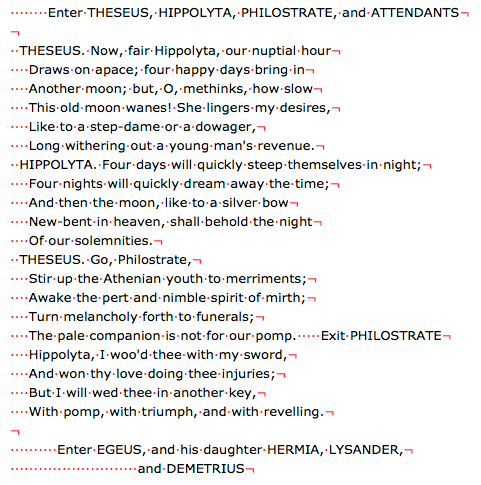
Find here an image that shows a sample extract of a scene in my text editor (Textwrangler). I have switched on the Show Hidden Characters so you can see spaces and line breaks. It looks as if the first line includes the name of the speaker and this spoken text is in verse. The stage directions are displaying as centred, but this is achieved by spaces added to the left of the text. This is because my text is a facsimile of a printed edition. I need to be aware of this. I can leave this alone 2before I place the whole text into InDesign, but eventually, I need to remove these spaces, and get the spacing needed by creating a style in InDesign.
You can optionally prepare the text in a word processor and use the styles to create your basic layout but I prefer to leave this aspect until the text is placed in InDesign.
We could remove these spaces and paragraph breaks, but my advice is to leave spaces alone until we have placed into the InDesign document.
A Replacement Strategy
The reason for leaving these unwanted spaces in the text, is that we will be looking for patterns in the text, to help us use Search and Replace across the whole of the Shakespeare play text. We can remove extra breaks (or carriage returns) between the paragraphs when we ‘Place’ the text. Switch this feature on when we place the text.
Placing the play text in InDesign

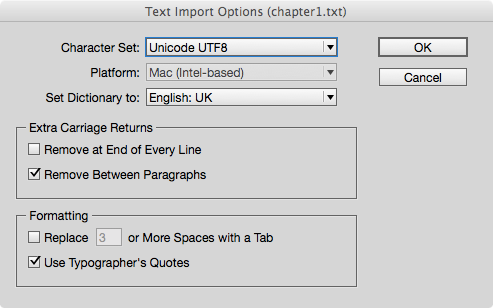
After we choose ‘Show Import Options’ we can opt to remove the unwanted paragraph breaks between paragraphs.3
I am presuming that you have prepared an InDesign document with the page size, margins and master pages. It would also make sense to prepare paragraph and character styles for each element needed.
Templates
Now is not the place to discuss the idea of templates, but I should mention that preparing an InDesign template with your styles is an excellent strategy for your workflow.
Show the hidden characters
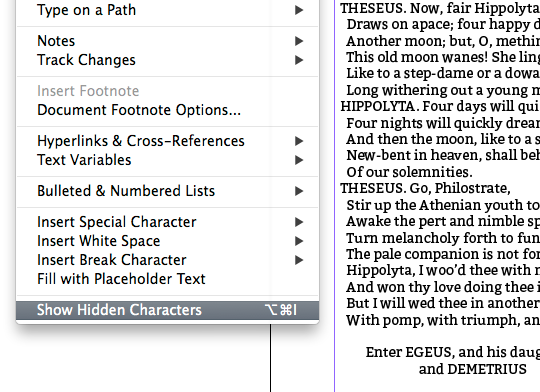
It is important to let InDesign show you the characters that do not print. You can view these by going to the Type menu and then at the very bottom select Show Hidden Characters.
You want to be able to see spaces and paragraph breaks, because you may need to replace those with the spacing rules in the paragraph styles.
Having placed (and flowed) our Shakespeare text into InDesign we can observe the unwanted spaces and begin to look for patterns that will help us make changes and even apply styles.
Let’s get styling
Any InDesign document will always have a [basic paragraph] style. It would be a good idea to set this paragraph style to your ‘root’ style. Set this to be a style that would suit the body text. With the text tool, select all of the text and with the paragraph styles showing select the [basic paragraph] style created above. Everything will begin to look better. Now with nothing selected make your adjustments to the styles for each element (Act, Scene, stage directions etc.) as you see fit.
Put your text cursor in one of the verse lines. Adjust the style to your liking. Same with the stage directions, ACT and Scene.
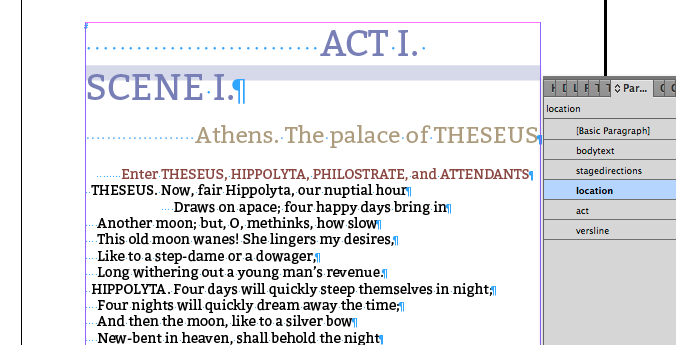
You can see in the image here that I have now created some styles for the headings and stage directions. I have created a style for the lines of verse but have only applied to one line so far. I now want to apply this to all lines, so I will use GREP to help with this. The spaces that you see are not acceptable for the eBook; but I will use the pattern to help me match the text to the styles.
Find and Change
Rather that go through the text by hand and apply the styles, I will use search and replace to make global changes. The question is, how do I locate the text to change? Can I apply a style to all lines of verse without changing the stage direction style?
GREP
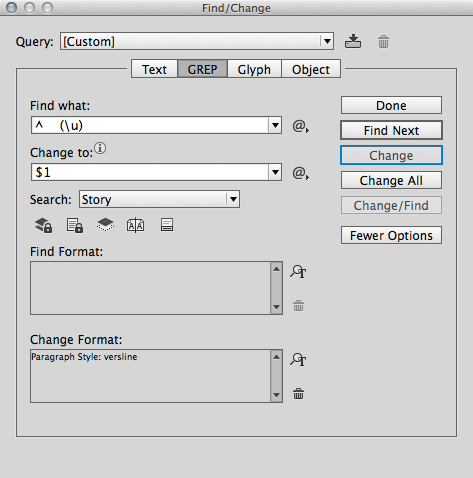
GREP (globally search a regular expression and print) is a technique available within InDesign that uses regular expressions to find patterns within the text. Looking at my text with hidden characters showing, I can see that if I search for 4 blank spaces followed by an uppercase character, this will capture the line of verse. Then I can remove the spaces and also apply my style throughout.
I have searched for ^ (\u) and I replaced with $1 (the contents of the bracket in the Find what box. I also changed to the paragraph style needed.
More GREP is used to locate and change the stage directions, ACT and scene. The false spaces that are within my text help me identify these patterns even though I plan to be rid of them!
The Character Names
There is great variety in the way the character names are displayed in Shakespeare play texts. Some texts only have an abbreviation for the name. Many have the name in uppercase and in the same line as the first line of the speech. We have lots of choices.
My plan is to put the character names on their own line, change the style and also put in as title case rather than all in uppercase.
There are several steps.
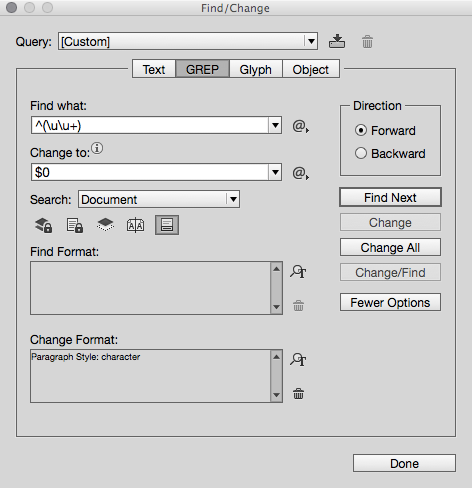
Here is the GREP that use to find the character names in the text:
^ (\u\u+)\.
This means: beginning of paragraph, at least 2 spaces, 2 or more capital letters followed by a full stop and a space. I want to keep what I find inside the brackets.
If your Shakespeare play has characters with more than one name with a space between the words (such as ‘FIRST FAIRY’) then you will need to use a second search term:
^ (\u\u+) (\u\u+)\.
If you want to type the pattern matching codes into the Find/Change dialogue box, then you will need to learn the syntax.
For further help on Find and Change see the Adobe web site.
There are many good books on Regular Expressions. I suggest reading about InDesign and GREP in: GREP in InDesign, Peter Kahrel, O’Reilly Media

To the right of the Find What and Change To text fields the @ sign will take you to a number of choices which will enter these pattern matching codes for you.
Here we see this menu where we select ‘Any White Space’.
The ‘Change To’ menu choices are different, because we will want to keep some parts of the text and add other items. In this case we want to keep what is in the brackets and add a paragraph break.
Our ‘Change To’ field becomes:
$1\r
Changing Styles with GREP
The next step is to apply a paragraph style to these character names that are now on their own line. We can use the Find/Change method again but this time use the Change Format selector tool.
You may wonder why we cannot do this at the same time as the first Find/Change. The reason is that have added the paragraph break, and because this will be selected with the successful change, the following line will also be styled. This, we do not want!
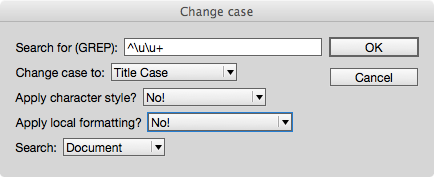
UPPERCASE or Not?
In my source text all of the character names are in UPPERCASE. That is they have been set with UPPERCASE letters. I really don’t want this; I want to control the case by style rule. Maybe I even want to use small-caps?
GREP in InDesign is great, but it doesn’t replace letters with a change of case. Text editors outside of InDesign can do this (TextWrangler for example), but to achieve this within InDesign we need to use a script. We need to use a script in combination with a GREP search.
The script that I plan to use does not come with a released version of InDesign, so you will need to locate one and add it to your copy of InDesign. The script that I have found works best is Search and change case by Peter Kahrel.
How to add a script to your copy of InDesign
You will find the Scripts panel under the Window>Utilities menu. When you have this open locate the User item; right click and then reveal in the finder (MAC only). You will need to place your script inside the Scripts Panel folder.
We can make use of this again to change the case of other occurrences of the character names in the play or the Dramatis Personae.
-
Most public domain texts of Shakespeare’s plays are created from print copies that have been scanned. ↩
-
The spacing throughout the text reveals a pattern - a certain number of spaces for each element. This will help us in out ‘Find and Replace’ strategy. ↩
-
You should only see one break between paragraphs. ↩
Filed under: InDesign, Typography, Design and Production
This page last edited on: 2017-11-08